 Call 1-800-661-9891
Mon-Fri 8am-8pm | Sat 9am-6pm (EST)
Call 1-800-661-9891
Mon-Fri 8am-8pm | Sat 9am-6pm (EST)

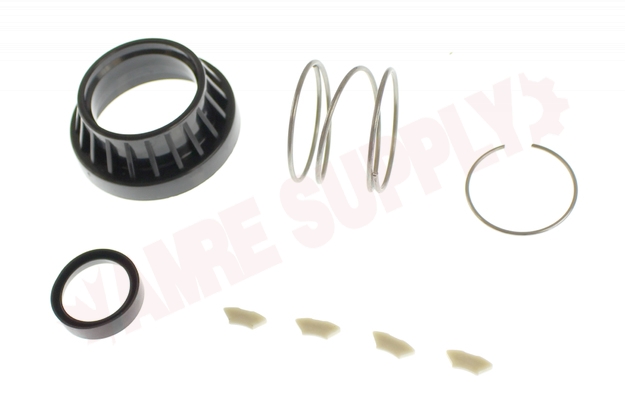
Whirlpool WP285170 Portable Dishwasher Faucet Adapter Coupling


1 of
Click Main Image to Enlarge
Grids Shown are 1" x 1"
If ordered before 4pm
Click here to check branch on hand inventory
Manufacturers Warehouse: 50+
Click here for estimated arrival time to your local branch
| SKU: | WP285170 |
Key Features
- Genuine OEM to optimize your performance
- Check your model number below to ensure this is the correct part for your appliance
- Connects the coupler to the faucet.
Whirlpool Genuine OEM WP285170 Portable Dishwasher Faucet Adapter Collar Kit. The faucet coupler collar kit connects the coupler to the faucet.
This part works with the following brands: Whirlpool, Roper, Admiral, Maytag, Hardwick, Jenn-Air, Estate, Magic Chef, Crosley, Inglis, Norge, Modern Maid, Amana, Kenmore, KitchenAid, Caloric, & IKEA.
Possible Repair Solution For:
Will not fill, leaking water, will not attach to faucet.
Please Note: This is intended as a guideline only, as other items can cause the same symptoms.
| Alberta | |
| Edmonton (DC): | 3 |
| Edmonton (South): | 4 |
| Calgary: | 3 |
| British Columbia | |
| Richmond: | 3 |
| Surrey: | 1 |
| Manitoba | |
| Winnipeg: | 2 |
| Saskatchewan | |
| Saskatoon: | 3 |
| Ontario | |
| Hamilton: | 3 |
| London: | 1 |
| Mississauga: | 4 |
| Scarborough: | 4 |
| Windsor: | 1 |
| Amre Branch | # of Days |
|---|---|
| Calgary: | 29 |
| Edmonton Downtown: | 37 |
| Edmonton South: | 29 |
| Hamilton: | 34 |
| London: | 29 |
| Mississauga: | 28 |
| Richmond: | 32 |
| Saskatoon: | 28 |
| Scarborough: | 28 |
| Surrey: | 31 |
| Windsor: | 23 |
| Winnipeg: | 32 |
Product Specifications
Product Downloads
Installation Instructions
Works with the Following Brands
Customer Reviews
Simple fix
Andre A - Edmonton, AB (Aug 22, '17)
Symptom: Dishwasher - Leaking
Symptom: Would not attach to fosset.
Repair Time: 5 min Minutes
Tools: Hands
Does what it's supposed to do. The cuppler now attaches to my faucet. I am just not sure what the rubber ring is for.
Missing info in Whirlpool instructions
Tom S - Bright, ON (Feb 17, '21)
Symptom: Dishwasher - Leaking
Repair Time: 5 Minutes
Tools: Small screw driver, grease, dental pick.
Whirlpool instructions & illustration do not mention/show rubber ring , the most important part!
Kudos to Thomas S from Calgary for instructions, especially the ring opening facing down. That should be in Bold type.
Works great
Thomas S - Calgary, AB (May 9, '18)
| Model: DP840DWGX2
Symptom: Dishwasher - Leaking
Symptom: Hard to hook/unhook coupler
Repair Time: 5 Minutes
Tools: small flat head screwdriver, grease
My Whirlpool portable dishwasher was leaking quite a bit whenever I hooked it up to the faucet. It would spray all over the counter and floor. This kit was a simple fix, and helped it slide on/off way easier than it would before. The instructions are a bit lacking, so here's a bit of extra help for anyone wanting to switch this out.
Step 1: Push down the collar and expose the retaining ring. Remove with the help of a small flat head screwdriver.
Step 2: Slide off the collar, remembering which orientation it was when on (in fact, take a photo of the assembly before you start).
Step 3: Slide off the spring.
Step 4: Remove the 4 slides. May have to angle it a bit in different directions for them all to fall out.
Step 5: Remove the O-ring/rubber gasket which is located inside the nozzle, under where the slides were. Remove with the help of a small flat head screwdriver. You might need to really look inside your unicoupler to find it.
Step 6: Insert new O-ring/rubber gasket by sliding down into the hole of the nozzle. Use a bit of grease to help it slide down (just a couple dabs). Insert it with the open gap facing down.
Step 7: Slide on the spring.
Step 8: Put a tiny dab of grease on each new slide as you insert them so they do not fall out.
Step 9: Slide new collar on, remembering the orientation.
Step 10: Put new retainer ring on.
This should take a total of about 5 minutes to do. And it will help your dishwasher connection. I ran my dishwasher right afterwards with a 4 liter jug of vinegar to help wash away the grease.
Similar Products Found In